Basic Low Vision Adjustments – Windows 10
Settings – Ease of Access
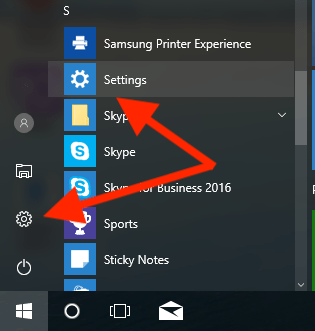
A handful of the accessibility settings we want to use are found in the Settings app in Windows 10. You can get there by following these steps.
- Click the Windows button in the bottom left corner or press the Windows key on the keyboard.
- Find settings in the list of applications or click on the gear logo on the left-hand side.
- A window will appear with various settings, click on ease of access.
Magnifier
On the left-hand side of the window you will see a list of features. Click on magnifier.
The built-in magnifier in Windows can be activated easily by:
- Holding down the Windows key and pressing the + button on the keyboard.
- With each consecutive use of the Windows and + button you will increase the magnification.
- To decrease the magnification, hold on the Windows key and press the minus key on the keyboard.
In Settings we can make some small adjustments to the way the magnifier works.
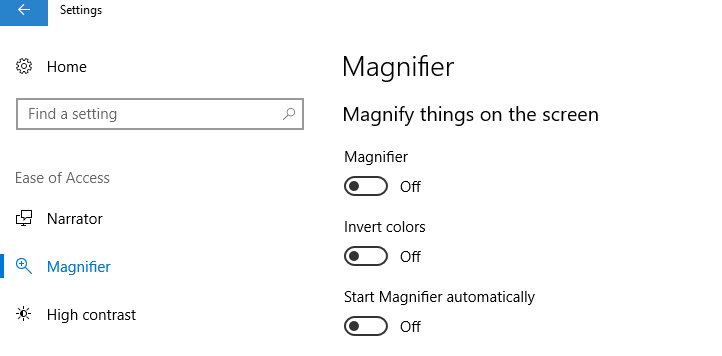
- On and Off switch. You don’t necessarily need to use this switch to turn on magnification as you can use the keyboard shortcut. But clicking this button will activate the Magnifier program.
- Invert colors. When turned on when the magnifier is activated all the colors on the screen will be reversed most commonly giving us black background with white text. You can also get a similar effect in the high contrast section which we will talk about later.
- Start Magnifier Automatically. This setting will ensure that the magnifier is turned on as soon as the computer is started up and is useful if the user wants a constant level of magnification. But like as mentioned before you can turn on the magnifier with the keyboard shortcut easily, so this feature may not be necessary for all users.
High Contrast
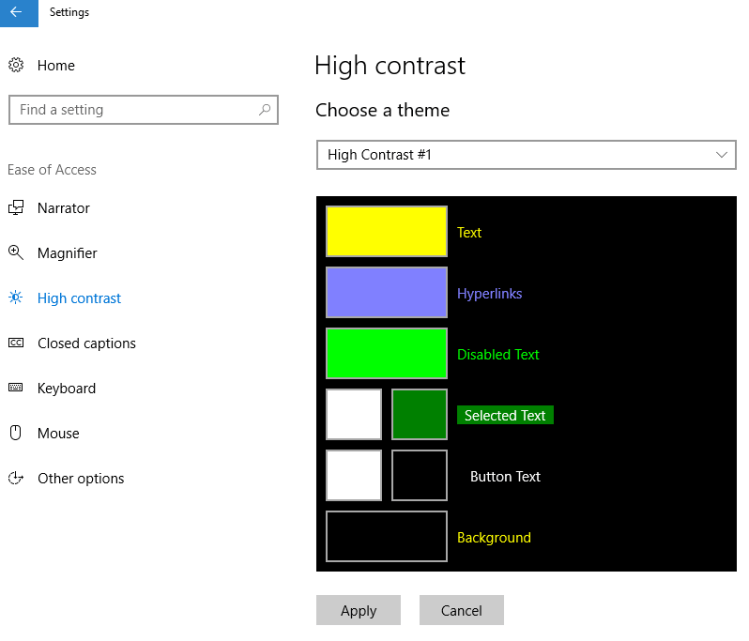
High contrast is a special type of theme that creates a very high contrast between text and the background. This will replace the desktop and backgrounds with a solid color black or a solid color white. You can then individually choose the text color based on the color preferences of the user.
Some web pages in some applications do not react well to high contrast settings. If a web page or program uses buttons that are dedicated to the color black they will not change colors when you choose a high contrast theme. That means some buttons can be rendered invisible by turning on a high contrast theme. It is best to make sure after turning on one of these features that the user tries the various apps and web pages they most commonly use to make sure there isn’t a conflict.
Mouse

In the mouse settings we can make some slight adjustments to the pointer size and the pointer color. You might note that the largest cursor size is still not all that large. It allows some basic adjustments, but for much larger cursors you do need to use software like ZoomText or MAGic.
Settings – System Settings – Display
If you are still in Ease of Access go back to the main settings menu by clicking the back button in the top left corner. Now click on the system section. Then click on Display on the right hand side.
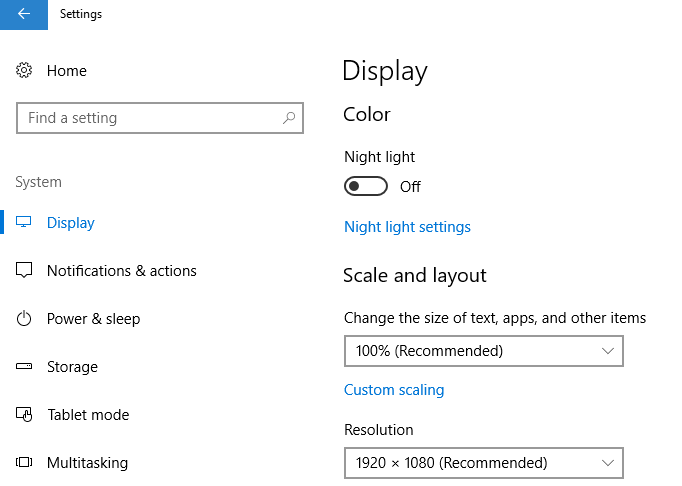
Scale and Layout
Adjusting the scale above 100% will increase the size of everything on the screen. This scaling is a universal adjustment, but can have some negative consequences.
I avoid moving above 150%. Larger displays can handle a larger scaling increase and but smaller displays cannot. There will be a little trial and error to find the right scaling for the user. What we are trying to avoid is making the windows so large that content no longer fits on the screen. Similar to the Contrast settings after making changes you should test each of applications and web pages that the customer uses to make sure that none of the windows have been scaled too large that buttons are no longer visible on the screen.
Resolution
Lowering the resolution will also increase the size of everything on the screen. There is a small sacrifice though as the content will become less clear the lower you set resolution. I suggest trying just one or two steps below the current resolution to see if that makes content large enough to be visible. Just like scaling you should also make sure that no content is too big that it no longer fits on the screen size.
Making Icons On the Desktop Bigger
You can separately adjust the size of icons on the desktop or other places on the computer by using the following steps.
- Right Click the mouse on the desktop. Do not click on any icons. Instead, click on the picture or colored background behind the icons that make up the background
- In the context menu that appears, choose View – then click on Large icons.
![]()
To adjust the size of icons inside of folders open a folder on the computer.
- Click the view button in the top left corner of the window.
- Click Extra-Large icons from the ribbon at the top.
- Click the option button on the right-hand side.
- In the window that appears, click the View tab.
- Click Apply to Folders button and then click the Yes in the window that appears. This will adjust all the folders of this type.
![]()
You may have to repeat the steps for a few different folders as it does not apply to every individual folder just to the folders of a similar type. For example, folders that only hold documents will all match each other, but it will not match folders designed for music or photos. So open each folder that the user commonly uses and repeat these steps. Eventually all the folder they use will match.
